Everything about food inspires me. It’s a chance to get loved ones together and make tantalising creations everyone will enjoy. If I am not busy cooking you can find me sprawled on our couch looking through the latest recipes in cook books and food mags for inspiration! Enjoy the reads! Xo


Monday, May 13, 2013

'Tis the season to be toasty with some home made soups

As Autumn brings in the cool, crisp air nothing quite warms the cockles of your heart like a gorgeous home made soup. Today I bring you two recipes. 

The first is an innovative soup I came across, called beetroot leaf soup. It's innovative because you are not wasting something that ordinarily would be thrown away. Beetroot leaves are packed with essential vitamins and minerals. So why not give this recipe a go?

The next is the reliable pumpkin soup. So simple to make and yet so consistently delicious. 

Beetroot Leaf Soup


Ingredients: 
  • 2 tablespoon olive oil
  • 3 celery sticks, chopped
  • 1 carrot, diced
  • 3 garlic cloves, chopped finely
  • 2 teaspoons cumin
  • beetroot leaves, approx 10-12 leaves with a small segment of the stalk
  • 2 tablespoons balsamic vinegar
  • 1 sprig of thyme
  • 1 litre vegetable stock
  • 1 tin chopped tomatoes
  • 2 tablespoons tomato puree/passata 

Method:
  1. Heat the oil in a saucepan. Add the onions and soften. Then add the celery and carrots. Allow to soften slightly. 
  2. Add cumin, garlic and balsamic vinegar. Allow the vinegar to evaporate.
  3. Add the beetroot leaves and allow to wilt. Add the salt and pepper.
  4. Add the tomato tin and puree.
  5. Bring to the boil and then reduce and simmer until all vegetables are soft.  This will take approx 20 mins.
  6. Blend the ingredients until it forms a smooth soup. Add additional salt and pepper if required.


Pumpkin Soup

Ingredients: 
  • 2 tablespoons olive oil
  • 1 brown onion, chopped
  • 2 teaspoon cumin
  • 1 butternut pumpkin (approx 1 kg)
  • 4 cups chicken stock
  • 1 garlic, chopped finely
  • European style natural yogurt - optional
  • Dukkah- optional

Method: 
  1. Heat the oil in a saucepan. Add the onions and stir until golden.
  2. Add cumin and stir through the onions.
  3. Add the pumpkin and coat in the onion mixture.
  4. Add stock.
  5. Simmer until the pumpkin is soft. This should take approx 20 mins. 
  6. Blend the ingredients until the soup is smooth.
  7. I like to serve this with a dollop of natural yogurt and dukkah, which adds creaminess and texture to the soup.


Friday, May 10, 2013

Beetroot and Wasabi Relish

Betroot is now in season and the perfect time to try some interesting recipes! If you have never cooked beetroot at home its quite the experience. My advice is be careful because the red dye will go everywhere!! But I guarantee its well worth the effort.

A fresh beetroot has a completely different flavour and texture to that of tinned beetroot.  As Indira Naidoo quoted in her cookbook, The Edible Balcony "[beetroot] has a far superior texture and taste than those spongy slices soaked in acid."

So why not give this recipe from Indira Naidoo's book a try? Its quick and full of delicious earthy flavours:

Ingredients:
  • 4 medium sized beetroot, washed and the stalk trimmed
  • 1/4 cup creme fraiche
  • 1 tablepsoon wasabi paste
  • 1 tablepsoon lemon juice
  • 1 teaspoon Dijon mustard
  • Freshly ground salt and pepper
Method:
  1. Cook the beetroot over high heat over until soft. Drain and set aside until cool enough to handle. Once cooled, remove the skins.
  2. Place the beetroot with all the remaining ingredients and pulse in your food processor until it comes to a rough paste.


It's a fantastic recipe to eat as part of a vegetarian meal. We had ours with pide bread, good quality olive oil, dukah, tabouli and cutlets. 


The Cut Bar & Grill


Since I posted a great little recipe about beef below, I thought it would be a timely time to share my experience eating at the Cut in Circular Quay. In my view, this is one of the best "meaty" restaurants in Sydney,  the dishes are varied and the flavours amazing. So keep this one handy next time your boyfriend/hubby has his meat craving;) Unlike a normal steak house, the restaurant is more up market.  It's dimly lit restaurant with rustic wooden furniture. The staff are friendly and attentive.

We began our entrees and the steak tartare was definitely one of the highlights for me.  You can see below how beautifully it is served. The best part is you can mix as little or as much of the condiments as you like. The meat melts in your mouth and the pickles, capers, and red onions add a delicious contrast, both in flavour and texture.


The second entree was the kingfish cerviche, which I must admit is a little deviation from the meat menu, but I promise our mains are "meaty"! The cured fish was delicious and dressed with radish and baby herbs. It was a pungent dish the leaves you salivating and ready for the next course. 


My hubby had the Wagu steak, cooked medium rare.  As you can see The Cut is all about the meat, there is no unnecessary dressings. Just mouth wateringly tender beef cooked to perfection.  


I had the roast beef topped with a spicy Chimmichurri  dressing.  The roast beef coming to the table is quite the spectacle as it is hand carved right in front of you.


Next time you feel like a good quality piece of beef, full of flavour then you really must try The Cut. 

Sichuan Style steamed beef


We have all heard about stir frying beef, braising beef, slow cooking beef and even eating raw beef in dishes like steak tartare. But have you ever considered steaming your beef?

The idea sounds very strange but I came across a fantastic recipe from the Chinese Guru himself, Mr Neil Perry. This dish will make you think about the way you can cook meats in a whole new way.

Steamed beef is done in the same way you would steam fish.  It requires the beef to be cut very thinly and then placed in a bamboo steamer.  The result is mouth wateringly tender beef.  

Ingredients:

For the beef marinade
  • 1 tablespoon dark soy sauce
  • 1 tablespoon fermented black beans (you can buy this in a packet from your Asian grocer and it can be kept in the fridge once opened)
  • 2 tablespoon shaoxing
  • 1 tablespoon hot bean paste
  • 1/2 teaspoon Sichuan peppercorns
  • 1 tablespoon vegetable/peanut oil
For the remaining dish
  • 450g porterhouse steak, cut into thin strips
  • 200g ground roast rice (I will show you how to do this below)
  • 4 tablespoons water
  • 2 tablespoons chopped coriander
  • 2 spring onions, chopped diagonally
  • 2 teaspoons sesame oil
Method:

1. To make the marinade mix the soy sauce, black means, shaoxing, bean paste, the freshly ground Sichuan peppercorns and peanut oil. Add this to the steak and leave to marinade for approximately 30 mins.


2. The next step is to prepare the ground roast rice.  To do this, place the rice in a heavy based saucepan. Dry roast until the rice becomes opaque but not coloured.  You can use jasmine rice or I like to use Basmati rice. The cool slightly and ground using a mortar and pestle.

3. Add the ground roast rice and mix with the marinated steak. Add the 4 tablespoons water.

4. Place the strips of steak on the bamboo steamer, cover with the lid and steam for approximately 20 mins on a low to medium heat. 
5. Add the coriander and spring onions and steam for a further minute.
6. Remove from the heat and drizzle with sesame oil.


Friday, April 26, 2013

How to cook a blue swimmer crab and two beautiful preparations

My hubby and I went to our first cooking class at the Sydney Fish Markets, many, many moons ago.  The lesson still remains one of the most interesting and useful classes we have attended. 

Today I show you how you clean a Blue Swimmer Crab and then two Asian style preparations to make this at home. Blue Swimmer Crab is widely available from your local seafood shop.  It has a sweet flavour. The Blue Swimmer Crab is already dead when it is at the fish markets. Look for crabs where all the legs are in tact and the shell is glossy.
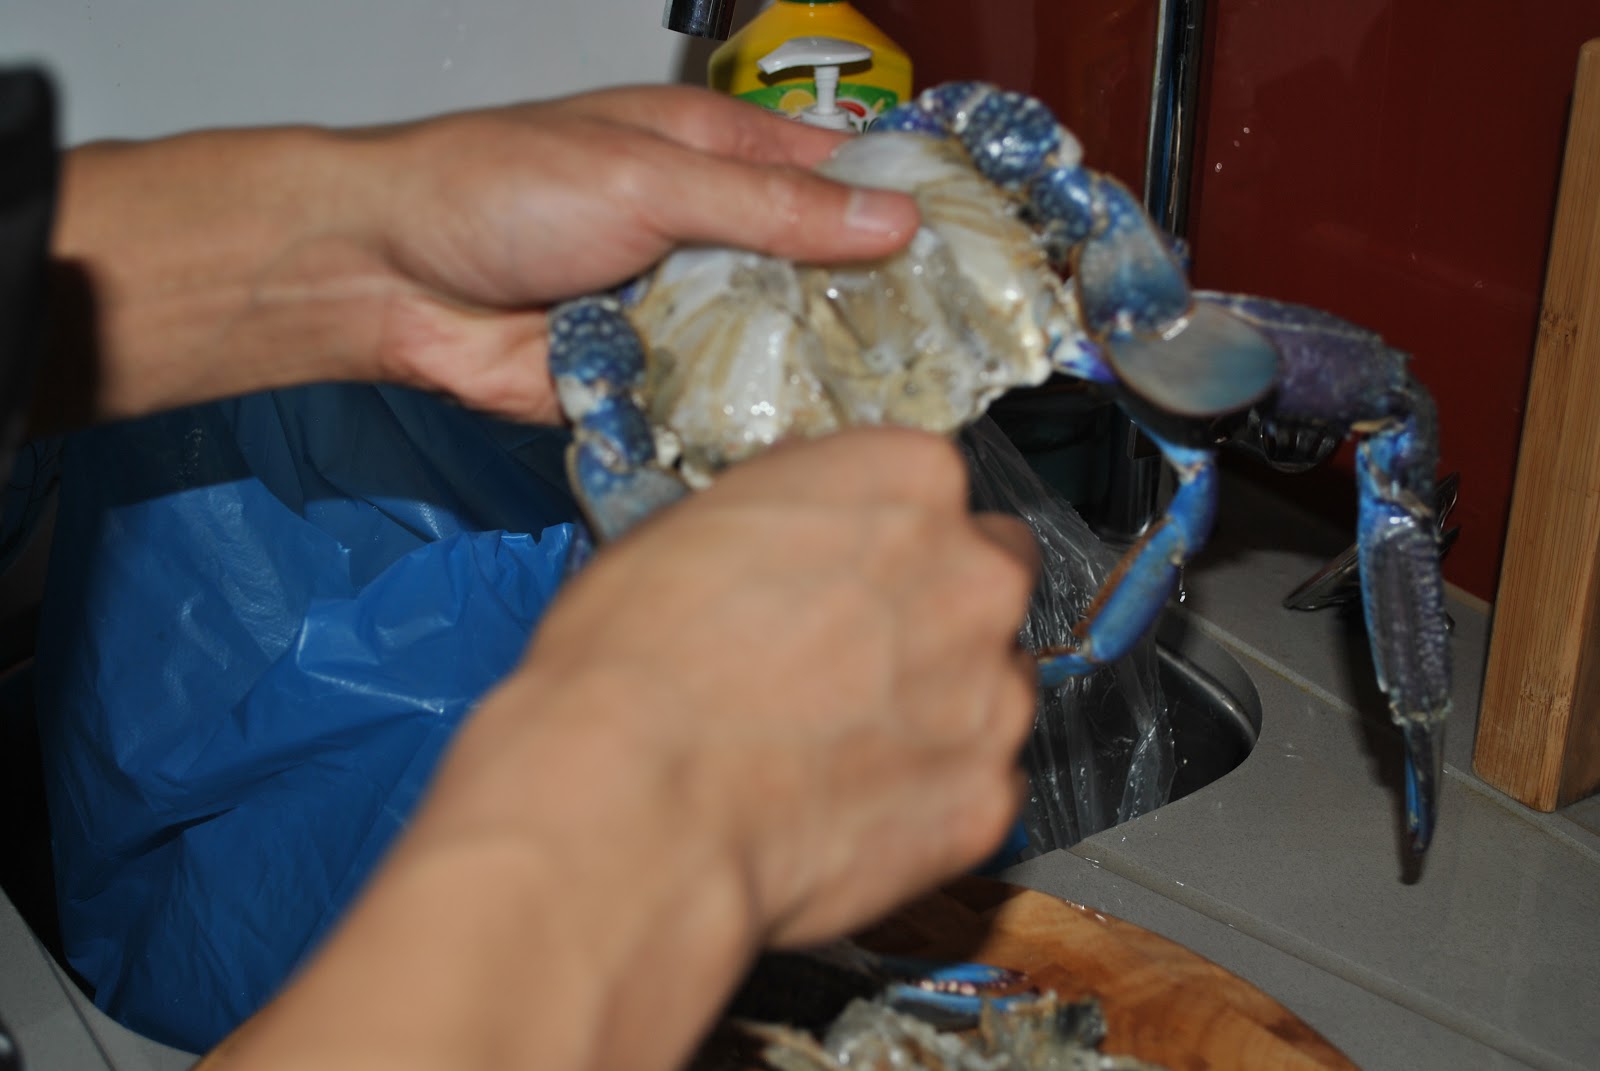
I'll start with how to clean and prep the crab - step by step. It's being demonstrated by my hubby in case you were wondering ;)

1. Place the cab so this side faces you.  The male cabs will have the "V" shape flap you can see above.  A female will have a "U" shape flap.  Ensure you use the male variety for sustainability reasons, where possible.


2. Lift the flap and remove the "head" or outer shell.


3.  Remove the "guts". You may wish to use a paper towel to assist you clean at this stage.  Do not wash the crab in an attempt to clean it though, because you will wash all the flavour away! 


4. The cleaned crab will something like this: 


5. Cut the crab in half. Then cut a further half. This will lead to a large claw with a small claw and the second portion will have two smaller claws.


6. Cut so the large claw and smaller claw are now seperated.  Cut the two smaller claws in half.

7. For the large claw, using a device (which looks similar to a nut cracker but used specifically for crabs), make small cracks to the shell.  This ensures when it is cooking the flavours are able to seep through.


Now the crab is prepped and ready you can start the cooking!  

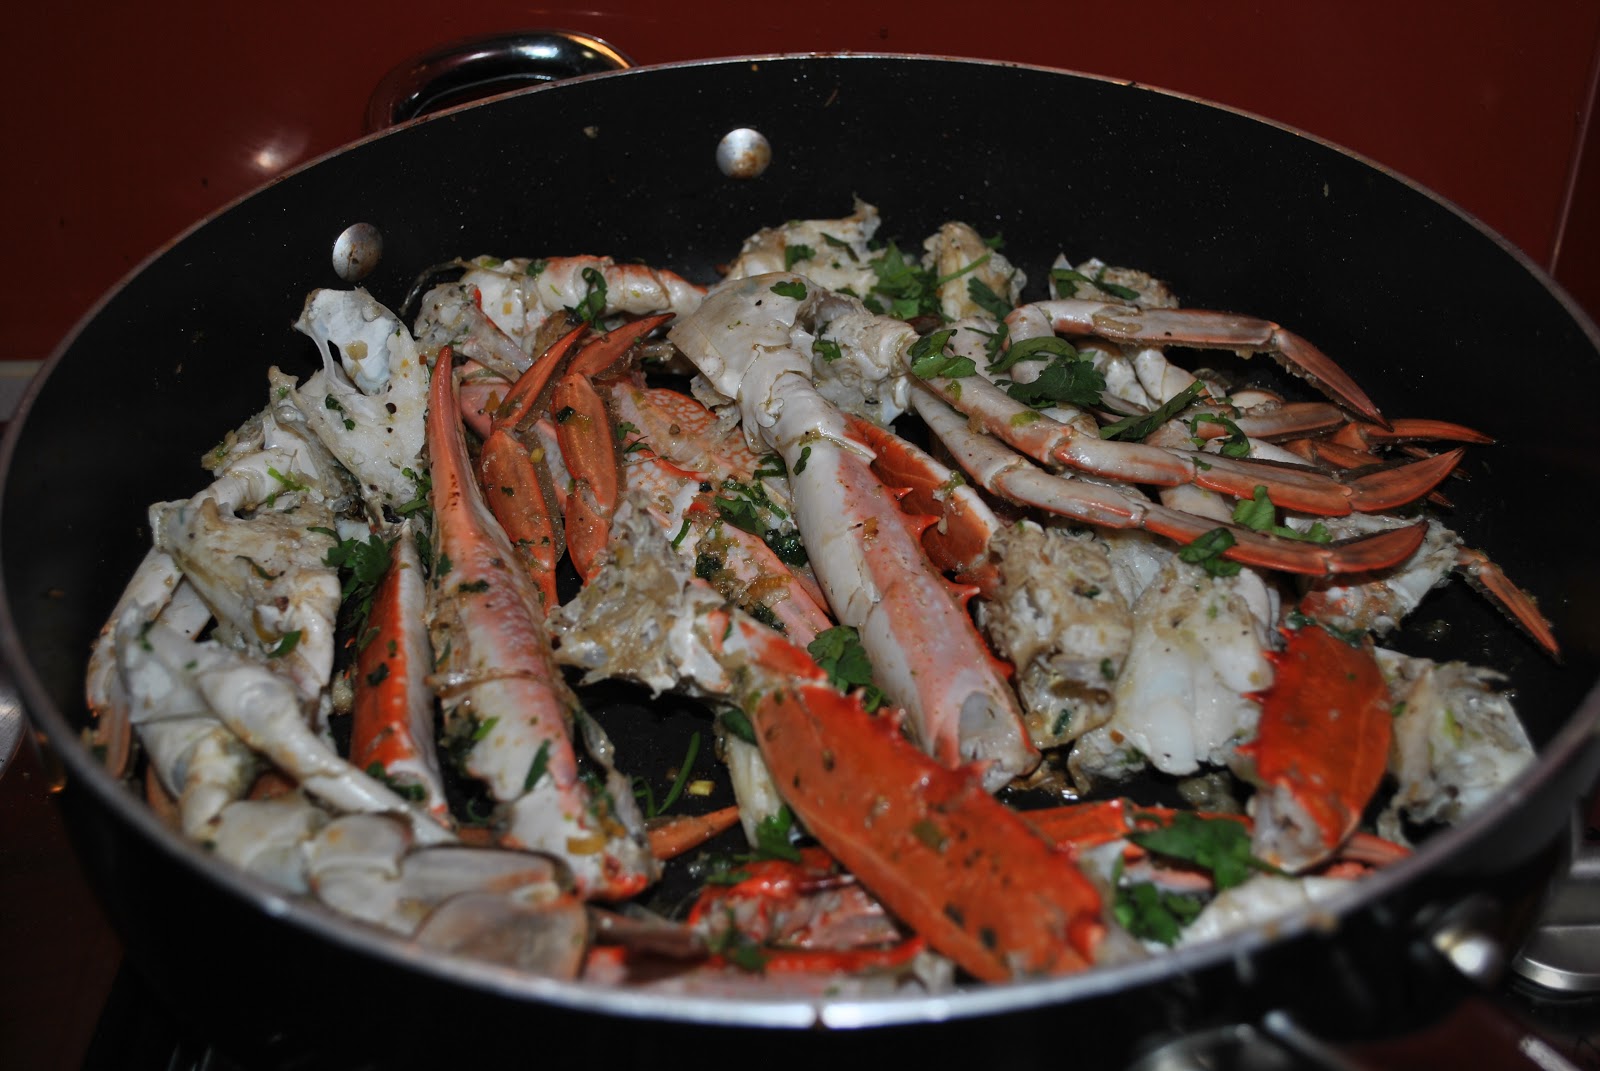
I have shown you below two beautiful preparations you can make. Try one, or as we like, make both and eat with a steaming pot of rice.

Each preparation serves three.   
   
Singaporean Chilli Crab 

Ingredients:


  • 3 cleaned blue swimmer crabs
  • 3 tbsp peanut oil
  • 3 cloves garlic, chopped finely
  • 2 birds eye chilli, chopped finely
  • small knob of grated ginger, minced
  • 1 tsp shrimp paste
  • 1 tsp cornflour
  • 1 cup fish stock
  • 160 ml tomato ketchup (must be ketchup not sauce as ketchup is a thicker variety)
  • 160 ml sweet chilli sauce (I like to use the Ayam brand)
  • 2 tbsp fish sauce
  • 1 tbsp shao xing (Chinese cooking wine)
  • 3 spring onions, slice diagonally 
  • 1 egg lightly beaten 
  • corriander leaves to garnish 


  • Method: 

    1. Heat wok over high heat.
    2. Once hot add the garlic, chilli, ginger and shrimp paste. Fry for less than one minute. This should be very aromatic.
    3. Add the crabs and stir fry until majority of the shells turn from blue to orange.
    4. In a separate container dissolve the cornflour in the fish stock, add the tomato ketchup, sweet chilli sauce, shao xing and fish sauce. 
    5. Add to to the wok with the spring onions.
    6. Reduce heat and stir the crab to ensure it is being coated in the sauce.
    7. The crab will be cooked all the shells turn from blue to orange and the crab meat turns from translucent to opaque.  
    8. Remove from the heat. Move the crab to one side of the wok. Slowly add the beaten egg by drizzling directly onto the sauce.  You want to create threads of egg through the sauce.
    9. Garnish with coriander leaves. 


    Salt and Pepper Crab

    Ingredients:

    • 3 cleaned blue swimmer crabs
    • 1/4 cup peanut oil
    • 3 cloves of garlic
    • small knob of ginger, minced
    • 1/2 stem of the lemongrass (I like to use a combination of the base and upper part)
    • rock salt (to taste)
    • 3 tsp white peppercorns, crushed in a motor and pestle
    • 2-3 spring onions
    • 2 tsp brown sugar
    • 50 ml shao xing (Chinese cooking wine)
    • coriander leaves to garnish 

    Method:
    1. Heat oil, add the garlic, ginger, lemongrass, salt and pepper and the crab.
    2. Stir until the crab is coated in all the ingredients then cook over a medium heat for 2-3 mins.
    3. Add the sugar, Chinese wine, and spring onions and stir through.
    4. Continue to cook until the shells turn from blue to orange and the crab meat turns from translucent to opaque.  
    5. Garnish with coriander leaves. 


    Wednesday, April 24, 2013

    Moroccan Style Preserved Lemon and Chicken Tagine

    Hi Guys! 

    I must start by saying wow has it really been over three months since I updated this blog? Time seems to fly! I must apologise for the delay but I do have an excuse… Promise! I just got married to the man of my dreams and we had an amazing honeymoon in Bali!

    But as things settle back to normality I have time to share with you all the amazing food experiences I have been lucky enough to have. Let me assure you, you are all in for a treat! I will share with you the recipes and experiences from my cooking class at a brilliant French patisserie, a number of new and tested dishes, a cooking class at an authentic Balinese restaurant in the heart of Bali's cultural capital Ubud and visits to a number of quirky new cafes and restaurants that are opening up right on our door step. I want to share all these experiences with you and hopefully inspire you to love food as much as I do!

    I wanted to start of my entries with a dish my husband and I absolutely love - the preserved lemon and chicken tagine. One of the things that really set apart this dish is how mouth-wateringly tender the chicken comes. This coupled with ingredients such as preserved lemons packs an oomph of flavour.

    Two things I should mention with this dish. One is if you can, buy a tagine. For those that are not sure what this is, a tagine has a flat and round base with low sides and a large cone shaped lid that sits over the base during cooking. 


    The second is preserved lemons. In my blog post all the way back in November, I made preserved lemons. They are super easy to make and the richness it will add, especially to your Middle Eastern dishes are well worth the effort. Off course you should be able to buy preserved lemons at any gourmet delicatessen.


    Okay so let's get to it! I hope you guys enjoy this dish as much as we do. Warning though, it’s absolutely addictive! 

    This dish serves four to five. 

    Preserved Lemon and Chicken Tagine 

    Ingredients: 

    Marinade:
    • 2 garlic cloves, chopped 
    • small knob of ginger 
    • ½ preserved lemon, rind only, rinsed and finely sliced 
    • 2 onions, chopped 
    • 1 small red chilli 
    • 1 tbsp sweet paprika 
    • 1 tbsp ground cumin 
    • 2 tbsp chopped coriander 
    • 2 tbsp chopped flat-leaf parsley 
    • 2 bay leaves, torn in half 
    • ½ tsp saffron threads, soaked in a little water 
    • 125 ml olive oil 
    • salt 

    For the Tagine 

    • 6 -7 chicken thigh fillets 
    • 2 tomatoes, 1 chopped, 1 sliced 
    • 2 onions, 1 chopped, 1 sliced 
    • 2 large potatoes, cut into wedges 
    • 150 g pitted green olives 
    • 1 bunch coriander, chopped 
    • 250 ml water 
    • 1 preserved lemon, rinsed and cut into 6 or 8 wedges

    Method: 
    1. Combine the marinade ingredients in a food processor and blend until finely chopped and thoroughly combined. Leave the flavours to infuse for about 20 minutes to half an hour. 
    2. Using half the marinade coat the chicken pieces 
    3. Combine the chopped tomato and onion with a little of the remaining marinade and spread over the base of a tagine (this will prevent the chicken from burning on the bottom). 
    4. Arrange the chicken pieces in the tagine. 
    5. Coat the potato wedges in a little of the remaining marinade and arrange around the chicken. 
    6. Top with the sliced onion, then the sliced tomato, and push the olives into the gaps. 
    7. Combine the remaining marinade with the coriander and water and pour over the top. Decorate with preserved lemon wedges.
    8. Cover the tagine with the lid and cook over a low heat for 45 minutes to one hour. Once the chicken is cooked serve to guests in the tagine.
    Below I have showed you the tagine arranged before cooking and what it will look like after! The smell of this dish cooking in your kitchen is absolutely divine.


    While this dish is magnificent in itself you can add a few side dishes that will really complete the meal.

    Cous Cous with herb, lemon and almonds


    Cous Cous is very simple to make and pairs beautifully with this dish. 


    Ingredients

    • 1/4 cup slivered almonds
    • 2 cups chicken stokc
    • 1 1/2 cups cous cous
    • 2 tbsp olive oil
    • 2 tbsp lemon juice
    • 1 tbsp grated lemon zest
    • 1/2 bunch chives, roughly chopped
    Method:
    1. Put the almonds on the stove and roast for about 3 minutes. Do not add oil. Toasting the almonds releases its natural oils
    2. Pour stock into a saucepan and bring to the boil. Turn of the heat. Add the cous cous. Stand until the cous cous has absorbed all the stock.
    3. Add the oil, lemon juice and lemon zest and using a fork fluff the grains.
    4. Add the almonds and chives and serve.
    Tomato and olive salad


    Ingredients 
    • 3 ripe tomatoes
    • 1 red onion
    • 2 tbps chopped parsley
    • 1/4 cup green olives
    • 2 tbsp red wine vinegar
    • 2 tbsp olive oil
    Method:
    1. Arrange the tomato and onions on a plate and scatter the parsley and olives.
    2. Drizzle the red wine and olive oil.
    3. Add salt and pepper to taste.

    There you have it a completed Morrocan Feast! Enjoy :)

    Tuesday, December 11, 2012

    Cinnamon Cookies

    It's the time of the year to get into the festive spirit! There is nothing better than the smell of homemade cookies baking away in the oven. 

    This is a twist to the usual gingerbread recipe, but offcourse you can make it into gingerbread by simply adding 2 teaspoons of ground ginger.  The maple syrup also gives it a subtle nutty flavour compared to using golden syrup.

    Don't forget to use Christmas shape cookie cutters to make it look that little bit extra special!

    Ingredients:
  • 125g butter (softened)
  • 2/3 cup brown sugar
  • 1/4 cup maple syrup
  • 1 egg, lightly beaten
  • 2 1/2 cups plain flour
  • 1/2 teaspoon bicarbonate of soda
  • 1 tablespoon ground ginger
  • 2 teaspoons ground cinnamon
  • cachous, to decorate as desired


  • Method:
    1. Using an electric mixer, beat butter and sugar until light and fluffy. Add the maple syrup and egg. Beat to combine.
    2. Sift flour, bicarbonate of soda, ginger and cinnamon over butter mixture and using a dough hook combine until a soft dough forms (you can also knead it by hand until a soft dough forms). Shape into a disc. Wrap in plastic wrap and refrigerate for 1 hor or until firm.
    3.  Preheat oven to 180°C. Roll dough between 2 sheets of baking paper and using your Christmas shaped cutters, cut shapes from the dough. Place, 2cm apart, on prepared trays.
    4.  Bake 1 tray at a time for 20 minutes, or until just firm to touch. Transfer to a wire rack to cool.
    5.  Decorate with cachous to add that extra touch and most importantly ENJOY!